Halaman

"ummmh..." Emoticon

Selasa, 24 Mei 2011

Langkah Mendesain Web

langkah_desain_web_lead

Untuk mengimbangi kepopuleran bidang desain website pada tahun 2010 ini, maka ada baiknya saya menulis tentang persiapan apa saja yang perlu kita lakukan sebelum mendesain website.

Mungkin banyak teman-teman pembaca setia Jurus Grafis yang belum familiar dengan cara kerja mendesain website, karena terbiasa dengan desain cetak (seperti saya dulu).

Dalam desain website, kita sebagai desainer tidak diharuskan bisa mem-program desain yang telah kita buat. Tapi tentu saja akan lebih baik jika kita bisa sekaligus mem-program desain kita sendiri, tapi kalau di rasa mem-program sebuah website itu merupakan pekerjaan berat, lebih baik kita berfokus pada interface dan konsep desain terlebih dulu.

Yang patut kita tahu adalah cara berpikir programmer, agar desain yang kita buat masuk akal untuk di wujudkan dalam code. Misalnya, salah satu cara programmer bekerja adalah dengan membuat bagian background terlebih dulu, karena itu desain yang kita buat harus tertata rapih di dalam folder (Photoshop) yang spesifik.

Baiklah, mari kita mulai saja langkah persiapan mendesain website.

1. Tujuan / Goal Website

langkah_desain_web_1

Setiap desain harus mempunyai tujuan yang jelas dan goal apa yang ingin di raih melalui website tersebut. Jika itu website portfolio, tentukan tujuan nya, apakah untuk mendapatkan projek baru? , melakukan personal branding atau untuk menjadi semacam katalog online hasil kerja kita?

Dengan tujuan yang jelas maka kita akan dengan mudah menemukan konsep dan gaya desain yang pas. Hindari tujuan untuk ‘tampil keren’ di awal pemikiran, karena desain yang kita anggap keren itu mungkin hanya bertahan dalam waktu 1 bulan saja, sehingga dalam waktu singkat kita merasa harus mendesain kembali website kita. “Keren” itu hanya “kulit” nya, yang terpenting adalah fungsi dan tujuan website tersebut.

2. Sitemap

langkah_desain_web_2

Sitemap merupakan bagian yang sangat vital, karena akan menjadi gambaran alur informasi yang jelas mengenai website yang akan kita buat. Tentukan navigasi dan fitur yang di perlukan di tahap ini dan buang fitur yang tidak efektif.

Kalau tujuan website sudah jelas, maka kita bisa berfokus pada tujuan itu dan tidak memasukkan fitur yang kurang penting, seperti chat box atau ruang iklan banner misalnya (sungguh aneh kalau di web portfolio ada banner iklan).

3. Sketsa / Wireframe

langkah_desain_web_3

Supaya tidak tersesat di kanvas kosong Photoshop, lebih baik kita merancang terlebih dulu di atas kertas. Langkah ini perlu untuk menghindari kerja dua kali di Photoshop. Bisa di bayangkan waktu yang terbuang ketika membuat background atau tombol terlihat bercahaya dan web 2.0 banget!, tapi ternyata letak dan ukurannya kurang tepat.

Tahap ini sangat perlu, terlebih jika kita berurusan dengan website yang mempunyai alur informasi yang kompleks. Dengan sketsa kita dapat menciptakan berbagai kemungkinan layout dengan cepat. Dan kalau kita bekerja dengan klien, mereka lebih senang kalau kita memulai projek dan memperlihatkan hasil sketsa kita sebelum melangkah ke tahap finishing di Photoshop. Ini bisa menjadi jalan untuk melibatkan klien secara aktif di dalam projek tanpa membuat kita kesal (karena untuk merubah hanya perlu menghapus sketsa saja).

4. Resolusi 72 Dpi & Warna RGB

langkah_desain_web_4

72 Dpi adalah resolusi standar untuk tampilan di monitor (jangan pernah membuat desain website di resolusi 100 dpi sekalipun, karena ukuran asli nya akan menjadi besar juga). Dan gunakan warna RGB yang memang di khususkan untuk monitor.

Well, langkah ini adalah langkah dasar yang tidak boleh di langgar, jadi jangan lupa teman :)

5. Lebar Konten Website Maksimal 960 Pixel

langkah_desain_web_5

Seheboh apapun desain yang kamu buat, jaga area konten (teks, foto dll) agar jangan melebihi lebar 960 Pixel. Ini karena standar monitor orang awam masih berkisar di resolusi 1024 x 768. Untuk bagian background image mungkin perlu untuk melebihi lebar 960 pixel ini dengan tujuan supaya background terlihat rapih dan tidak terpotong jika di buka di monitor yang lebar seperti 1360 x 768 pixel atau lebih.

6. Gunakan Grid System

langkah_desain_web_6

Grid bukanlah suatu pembatasan kreatifitas terhadap desain. Grid di ciptakan untuk mempermudah kita menjaga konsistensi layout dari halaman satu ke halaman yang lain. Selain itu gird juga membantu programmer yang akan menslicing desain kita di photoshop.

Saya biasa menggunakan 960 Grid System, karena sudah merupakan standar di jaman sekarang ini. Jika kamu tidak mau menggunakan grid yang sudah ada, silakan gunakan grid kamu sendiri. Yang terpenting lebar area konten tidak boleh melebihi 960 pixel.

7. Manajemen Folder & Layer di Photoshop

langkah_desain_web_7

Biasakan untuk membuat folder di bagian-bagian penting sebuah website, misalnya, folder header, folder body, folder sidebar, folder footer. Sebenarnya nama folder nya bisa terserah kamu, yang penting di namakan dan masing-masing layer yang termasuk ke dalam satu bagian/section di satukan ke dalam satu folder.

Jangan lupa juga untuk menamakan setiap layer, sehingga akan mudah jika kita ingin mengedit desain kita nanti dan tentu saja ini sangat menolong programmer yang bekerjasama dengan kita.

Kesimpulan

7 langkah di atas adalah langkah awal supaya kita terbiasa mendesain dalam keadaan yang terorganisir (khususnya desain website). Karena kita tahu terkadang kita tidak bisa menyelesaikan suatu projek sendirian, dalam hal ini mungkin kita butuh teman programmer, jadi supaya code yang di hasilkan juga rapih, kita sebagai desainer juga harus memberikan “file mentah” yang rapih.

Sudah siap beralih menjadi web desainer? Atau mungkin ada langkah yang tertinggal? Ayo berbagi pendapat di kolom komentar! :D

http://jurusgrafis.com


Senin, 23 Mei 2011

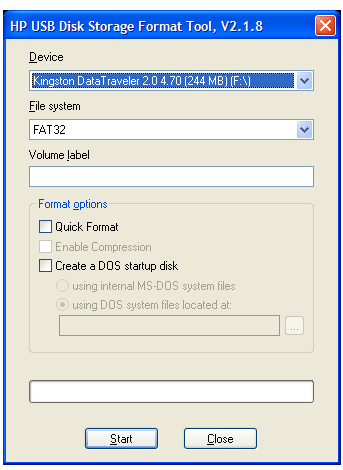
HP USB Disk Storage Format Tool - v2.1.8

HP USB Disk Storage Format Tool will format any USB flash drive, with your choice of FAT, FAT32, or NTFS partition types.Additionally, the drive can be made bootable by using system files from Windows 98 startup-disks.

By default on USB flash file system of FAT32, because of what files measuring more than 2 Gb writing down is not possible. By the program HP USB Disk Storage Format Tool it is possible to change the file system of your flash on NTFS.It has a graphical interface very similar to that of the Windows format tool.

12-27-2009 11-01-14

Features

  • Allows creation of a FAT32 volume larger than 32 GB.
  • Fixes installation issue where installation process stopped after the earlier version of software was uninstalled and the new software was not automatically installed. The installation process now restarts automatically to install the new software after uninstalling the older version

dl2 HP USB Disk Storage Format Tool Or http://www.mediafire.com/?trnhjngzwtz | 1.97MB | Freeware |OS:Windows 2K/XP

Anime: Bakuman


Title : Bakuman
Japanese Title : バクマン。
Official Site : http://www9.nhk.or.jp/anime/bakuman/
Category : TV
Total Episodes : -
Genres : School Life
Year Published : 2010
Release Date : 2010-10-00
Broadcaster : -
Studio : -
US Distribution : -

Bakuman follows the story of high school student Mashiro Moritaka, a talented artist who does not know what he wants to do with his future. One day he draws a picture of Azuki Miho, a girl he is secretly fond of, during class and forgets the notebook at school. He comes back to find that his classmate Takagi Akito is waiting for him with his notebook. Takagi tries to convince Mashiro to become a mangaka, a manga artist, with him, only leading to Mashiro's disagreement. Mashiro goes home and thinks about his mangaka uncle, who had only one successful series before he died in obscurity. Mashiro is interrupted by a phone call from Takagi, who says that he is going to tell Azuki that Mashiro likes her. Mashiro runs down to Azuki's house to find Takagi waiting for him. Once Azuki comes out to meet them, Takagi tells her that he and Mashiro are aiming to be mangaka. Mashiro then learns that she wants to be a seiyuu, a voice actor, and has shown promise in the field. Mashiro, once again thinking about his uncle, accidentally proposes to Azuki who accepts. However, she will only marry him after they achieve their dreams.

Episode 01 : Megaupload | FileServe
Episode 02 : Megaupload | FileServe
Episode 03 : Megaupload | FileServe
Episode 04 : Megaupload | FileServe
Episode 05 : Megaupload | FileServe
Episode 06 : Megaupload | FileServe
Episode 07 : Megaupload | FileServe
Episode 08 : Megaupload | FileServe
Episode 09 : Megaupload | FileServe
Episode 10 : Megaupload | FileServe
Episode 11 : Megaupload | FileServe
Episode 12 : Megaupload | FileServe
Episode 13 : Megaupload | FileServe
Episode 14 : Megaupload | FileServe
Episode 15 : Megaupload | FileServe
Episode 16 : Megaupload | FileServe
Episode 17 : Megaupload | FileServe
Episode 18 : Megaupload | FileServe
Episode 19 : Megaupload | FileServe
Episode 20 : Megaupload | FileServe
Episode 21 : Megaupload | FileServe
Episode 22 : Megaupload | FileServe
Episode 23 : Megaupload | FileServe
Episode 24 : Megaupload | FileServe
Episode 25 : Megaupload | FileServe

--==--


=================
Size : ~60 mb
Codec : x264
Bitrate : 300
=================


LQ for those who dont have good speed connection for download. If you have problem playing our video, please post it at forum. Our main link is Megaupload so we dont reupload for mirror's link.

Episode 01 : Mediafire | Megaupload | FileServe
Episode 02 : Mediafire | Megaupload | FileServe
Episode 03 : Mediafire | Megaupload | FileServe
Episode 04 : Mediafire | Megaupload | FileServe
Episode 05 : Mediafire | Megaupload | FileServe
Episode 06 : Mediafire | Megaupload | FileServe
Episode 07 : Mediafire | Megaupload | FileServe
Episode 08 : Mediafire | Megaupload | FileServe
Episode 09 : Mediafire | Megaupload | FileServe
Episode 10 : Mediafire | Megaupload | FileServe
Episode 11 : Mediafire | Megaupload | FileServe
Episode 12 : Mediafire | Megaupload | FileServe
Episode 13 : Mediafire | Megaupload | FileServe
Episode 14 : Mediafire | Megaupload | FileServe
Episode 15 : Mediafire | Megaupload | FileServe
Episode 16 : Mediafire | Megaupload | FileServe
Episode 17 : Mediafire | Megaupload | FileServe
Episode 18 : Mediafire | Megaupload | FileServe
Episode 19 : Mediafire | Megaupload | FileServe
Episode 20 : Mediafire | Megaupload | FileServe
Episode 21 : Mediafire | Megaupload | FileServe
Episode 22 : Mediafire | Megaupload | FileServe
Episode 23 : Mediafire | Megaupload | FileServe
Episode 24 : Mediafire | Megaupload | FileServe
Episode 25 : Mediafire | Megaupload | FileServe

(cyber12.com)

Kamis, 19 Mei 2011

EDGE for NDS

Edge of fun.
The iEDGE and EDGE are multi functional media adapters for DSi, DSL and DS. The EDGE series allows use of homebrew NDS applications, multimedia and commercial NDS applications. Our products are highly compatible with the latest commercial ROM’s and we update our software frequently to ensure reliability remains at the top of industry. Support for our product is provided quickly though our customer support team and dedicated resellers. Stay ahead of the game, choose EDGE..


* Supports DS/DSL
* Supports MicroSDHC cards up to 32GB
* Plays Commercial NDS ROM
* Plays Homebrew NDS ROMS
* Touch to execute OS system
* Works with Moonshell for multimedia
* playback such as movies and MP3's
* Frequently updated OS for best compatibility
* Action Replay compatible cheat system
* Brighntess adjustment for NDSL
* In game reset
* Full download play support
* Supports slot 2 expansions
* Multi language user interface
* Save game saves directly to Micro SD
* Automatic save game type detection
* Supports clean ROMs
* Robust non-spring loaded Micro SD slot
* Micro SDHC card reader included


EDGE Specific Downloads
NOTE: You MUST download the EDGE OS and copy EDGE.DAT onto your MicroSD card in order to use EDGE!
EDGE OS v2.3
You must download and copy to MicroSD card in order to use EDGE!
EDGE Reference Manual
Instructions for how to use EDGE


Moonshell (Rel 2)
Media player for music and video