Halaman

"ummmh..." Emoticon

Jumat, 23 September 2011

Batik, the Traditional Fabric of Indonesia

It would be impossible to visit or live in Indonesia and not be exposed to one of the country's most highly developed art forms, batik. On your first visit to a batik store or factory you will undoubtedly experience an overwhelming stimulation of the senses - due to the many colors, patterns and the actual smell of batik. Only through repeated visits and a bit of study will the types of designs and their origins become apparent.

The word batik is thought to be derived from the word 'ambatik' which translated means 'a cloth with little dots'. The suffix 'tik' means little dot, drop, point or to make dots. Batik may also originate from the Javanese word 'tritik' which describes a resist process for dying where the patterns are reserved on the textiles by tying and sewing areas prior to dying, similar to tie dye techniques. Another Javanese phase for the mystical experience of making batik is “mbatik manah” which means “drawing a batik design on the heart”.

A Brief History

Although experts disagree as to the precise origins of batik, samples of dye resistance patterns on cloth can be traced back 1,500 years ago to Egypt and the Middle East. Samples have also been found in Turkey, India, China, Japan and West Africa from past centuries. Although in these countries people were using the technique of dye resisting decoration, within the textile realm, none have developed batik to its present day art form as the highly developed intricate batik found on the island of Java in Indonesia.

King Kertajasa East Java 1294-1309

Although there is mention of 'fabrics highly decorated' in Dutch transcripts from the 17th century, most scholars believe that the intricate Javanese batik designs would only have been possible after the importation of finely woven imported cloth, which was first imported to Indonesia from India around the 1800s and afterwards from Europe beginning in 1815. Textile patterns can be seen on stone statues that are carved on the walls of ancient Javanese temples such as Prambanan (AD 800), however there is no conclusive evidence that the cloth is batik. It could possibly be a pattern that was produced with weaving techniques and not dying. What is clear is that in the 19th century batik became highly developed and was well ingrained in Javanese cultural life.

Some experts feel that batik was originally reserved as an art form for Javanese royalty. Certainly it's royal nature was clear as certain patterns were reserved to be worn only by royalty from the Sultan's palace. Princesses and noble women may have provided the inspiration for the highly refined design sense evident in traditional patterns. It is highly unlikely though that they would be involved in any more than the first wax application. Most likely, the messy work of dyeing and subsequent waxings was left to court artisans who would work under their supervision.

Javanese royalty were known to be great patrons of the arts and provided the support necessary to develop many art forms, such as silver ornamentation, wayang kulit (leather puppets) and gamelan orchestras. In some cases the art forms overlap. The Javanese dalang (puppeteer) not only was responsible for the wayang puppets but was also an important source of batik patterns. Wayang puppets are usually made of goat skin, which is then perforated and painted to create the illusion of clothing on the puppet. Used puppets were often sold to eager ladies who used the puppets as guides for their batik patterns. They would blow charcoal through the holes that define the patterns of clothing on the puppets, in order to copy the intricate designs onto the cloth.

Tambil Miring Design

Other scholars disagree that batik was only reserved as an art form for royalty, as they also feel its use was prevalent with the rakyat, the people. It was regarded an important part of a young ladies accomplishment that she be capable of handling a canting (the pen-like instrument used to apply wax to the cloth) with a reasonable amount of skill, certainly as important as cookery and other housewifery arts to Central Javanese women.

Selection and Preparation of the Cloth for Batik

Natural materials such as cotton or silk are used for the cloth, so that it can absorb the wax that is applied in the dye resisting process. The fabrics must be of a high thread count (densely woven). It is important that cloth of high quality have this high thread count so that the intricate design qualities of batik can be maintained.

Applying wax with a canting to create Batik

The cloth that is used for batik is washed and boiled in water many times prior to the application of wax so that all traces of starches, lime, chalk and other sizing materials are removed. Prior to the implementation of modern day techniques, the cloth would have been pounded with a wooden mallet or ironed to make it smooth and supple so it could best receive the wax design. With the finer machine-made cotton available today, the pounding or ironing processes can be omitted. Normally men did this step in the batik process.

Strict industry standards differentiate the different qualities of the cloth used today, which include Primissima (the best) and Prima. The cloth quality is often written on the edge of the design. A lesser quality cloth which is often used in Blaco.

Batik Design Tools

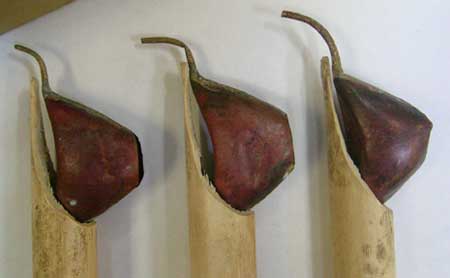
Although the art form of batik is very intricate, the tools that are used are still very simple. The canting, believed to be a purely Javanese invention, is a small thin wall spouted copper container (sometimes called a wax pen) that is connected to a short bamboo handle. Normally it is approximately 11 cm. in length. The copper container is filled with melted wax and the artisan then uses the canting to draw the design on the cloth.

Canting have different sizes of spouts (numbered to correspond to the size) to achieve varied design effects. The spout can vary from 1 mm in diameter for very fine detailed work to wider spouts used to fill in large design areas. Dots and parallel lines may be drawn with canting that have up to 9 spouts. Sometimes a wad of cotton is fastened over the mouth of the canting or attached to a stick that acts as a brush to fill in very large areas.

Canting, the traditional Indonesian tool that is used to apply wax in fine dots and lines on a cloth. Wherever the wax is applied, the cloth resists the next dye bath that it is put in .. leaving the white dot/line (or another color if the cloth has already been dyed).

Tips of different canting - used to make batik tulis Though the size of most canting are similar .. the difference is in the "tip" that allows the wax to flow from the "bowl". Bigger holes in the tip allow wider lines and bigger dots.
Bowl of the traditional batik canting from Indonesia Looking down on the top of the "bowl" where the wax is held prior to application to the cloth.
Looking at the underside of the batik canting - differnt hole sizes This closeup shows the various sizes of opening holes in the tips.
applying wax dot by dot with a batik canting Each wax dot is applied one by one by the canting.
applying lines and filling in spaces with the canting The canting points to the curvy lines which it created in this finished piece of batik.
making small dots with a canting The canting points to the small dots it created in this finished piece.

Wajan

Wajan is used to melt the wax

The wajan is the container that holds the melted wax. It looks like a small wok. Normally it is made of iron or earthenware. The wajan is placed on a small brick charcoal stove or a spirit burner called an 'anglo'. The wax is kept in a melted state while the artisan is applying the wax to the cloth.

Wax

Different kinds and qualities of wax are used in batik. Common waxes used for batik consist of a mixture of beeswax, used for its malleability, and paraffin, used for its friability. Resins can be added to increase adhesiveness and animal fats create greater liquidity.

Blowing into the Canting keeps the wax flowing freely

The best waxes are from the Indonesian islands of Timor, Sumbawa and Sumatra; three types of petroleum-based paraffin (white, yellow and black) are used. The amounts mixed are measured in grams and vary according to the design. Wax recipes can be very closely guarded secrets. Varying colors of wax make it possible to disguise different parts of the pattern through the various dying stages. Larger areas of the pattern are filled in with wax that is cheaper quality and the higher quality wax is used on the more intricately detailed sections of the design.

The wax must be kept at the proper temperature. A wax that is too cool will clog the spout of the canting. A wax that is too hot will flow too quickly and be uncontrollable. The artisan will often blow into the spout of the canting before applying wax to the cloth in order to clear the canting of any obstructions.
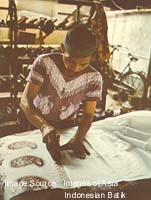
Cap

Cap utilize copper string to make various designs

Creating batik is a very time consuming craft. To meet growing demands and make the fabric more affordable to the masses, in the mid-19th century the . cap. (copper stamp - pronounced chop) was developed. This invention enabled a higher volume of batik production compared to the traditional method which entailed the tedious application of wax by hand with a canting.

Each cap is a copper block that makes up a design unit. Cap are made of 1.5 cm wide copper stripes that are bent into the shape of the design. Smaller pieces of wire are used for the dots. When complete, the pattern of copper strips is attached to the handle.

The cap must be precisely made. This is especially true if the pattern is to be stamped on both sides of the fabric. It is imperative that both sides of the cap are identical so that pattern will be consistent.

Applying wax with cap

Sometimes cap are welded between two grids like pieces of copper that will make a base for the top and the bottom. The block is cut in half at the center so the pattern on each half is identical. Cap vary in size and shape depending on the pattern they are needed for. It is seldom that a cap will exceed 24 cm in diameter, as this would make the handling too difficult.

Men usually handle the application of wax using cap. A piece of cloth that involves a complicated design could require as many as ten sets of cap. The usage of cap, as opposed to canting, to apply the wax has reduced the amount of time to make a cloth.

Today, batik quality is defined by cap or tulis, the second meaning hand-drawn designs which use a canting, or kombinasi, a combination of the two techniques.

Dyes

Traditional colors for Central Javanese batik were made from natural ingredients and consisted primarily of beige, blue, brown and black.

The oldest color that was used in traditional batik making was blue. The color was made from the leaves of the Indigo plant. The leaves were mixed with molasses sugar and lime and left to stand overnight. Sometimes sap from the Tinggi tree was added to act as a fixing agent. Lighter blue was achieved by leaving the cloth in the dye bath for short periods of time. For darker colors, the cloth would be left in the dye bath for days and may have been submerged up to 8 - 10 times a day.

In traditional batik, the second color applied was a brown color called soga. The color could range from light yellow to a dark brown. The dye came from the bark of the Soga tree. Another color that was traditionally used was a dark red color called mengkuda. This dye was created from the leaves of the Morinda Citrifolia.

The final hue depended on how long the cloth was soaked in the dye bath and how often it was dipped. Skilled artisans can create many variations of these traditional colors. Aside from blue, green would be achieved by mixing blue with yellow; purple was obtained by mixing blue and red. The soga brown color mixed with indigo would produce a dark blue-black color.

Design Process

The outline of the pattern is blocked out onto the cloth, traditionally with charcoal or graphite. Traditional batik designs utilize patterns handed down over the generations. It is very seldom that an artisan is so skilled that he can work from memory and would not need to draw an outline of the pattern before applying the wax. Often designs are traced from stencils or patterns called pola. Another method of tracing a pattern onto a cloth is by laying the cloth on a glass table that is illuminated from below which casts a shadow of the pattern onto the cloth. The shadow is then traced with a pencil. In large batik factories today, men usually are in charge of drawing the patterns onto the cloth.

Waxing

Applying wax with a Canting

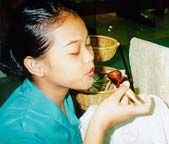
Once the design is drawn out onto the cloth it is then ready to be waxed. Wax is applied to the cloth over the areas of the design that the artisan wishes to remain the original color of the cloth. Normally this is white or cream.

Female workers sit on a low stool or on a mat to apply the wax with a canting. The fabric that they are working on is draped over light bamboo frames called gawangan to allow the freshly applied wax to cool and harden. The wax is heated in the wajan until it is of the desired consistency. The artisan then dips her canting into the wax to fill the bowl of the canting.

Artisans use the wax to retrace the pencil outline on the fabric. A small drop cloth is kept on the woman. s lap to protect her from hot dripping wax. The stem of the canting is held with the right hand in a horizontal position to prevent any accidental spillage, which greatly reduces the value of the final cloth. The left hand is placed behind the fabric for support. The spout does not touch the fabric, but it held just above the area the artisan is working on. To ensure the pattern is well defined, batik is waxed on both sides. True tulis batik is reversible, as the pattern should be identical on both sides.

The most experienced artisans normally do first waxings. Filling in of large areas may be entrusted to less experienced artisans. Mistakes are very difficult to correct. If wax is accidentally spilt on the cloth, the artisan will try to remove the unwanted wax by sponging it with hot water. Then a heated iron rod with a curved end is used to try and lift off the remaining wax. Spilled wax can never be completely removed so it is imperative that the artisans are very careful.

Applying wax with a copper cap

If the cap method is utilized, this procedure is normally done by men. The cap are dipped into melted wax. Just under the surface of the melted wax is a folded cloth approximately 30 centimeters square. When this cloth is saturated with wax it acts like a stamp pad. The cap is pressed into the fabric until the design side of the cap is coated with wax. The saturated cap is then stamped onto the fabric, leaving the design of the cap. This process is repeated until the entire cloth is covered. Often cap and canting methods are combined on the same piece of cloth.

Better quality batik may be waxed utilizing canting in one part of Indonesia and then sent to another part of Indonesia where the cap part of the process is completed. On better quality cap fabric great care is taken to match the pattern exactly. Lower grade batik is characterized by overlapping lines or lightened colored lines indicating the cap was not applied correctly.

Dyeing

After the initial wax has been applied, the fabric is ready for the first dye bath. Traditionally dying was done in earthenware tubs. Today most batik factories use large concrete vats. Above the vats are ropes with pulleys that the fabric is draped over after it has been dipped into the dye bath.

The waxed fabric is immersed in the dye bath of the first color. The amount of time it is left in the bath determines the hue of the color; darker colors require longer periods or numerous immersions. The fabric is then put into a cold water bath to harden the wax.

Dye Bath

When the desired color has been achieved and the fabric has dried, wax is reapplied over the areas that the artisan wishes to maintain the first dye color or another color at a later stage in the dying process.

When an area that has been covered with wax previously needs to be exposed so that it can be dyed, the applied wax is scraped away with a small knife. The area is then sponged with hot water and resized with rice starch before it is re-immersed in the subsequent dye bath.

If a marble effect is desired, the wax is intentionally cracked before being placed in the dye bath. The dye seeps into the tiny cracks that create the fine lines that are characteristic of batik. Traditionally, cracks were a sign of inferior cloth especially on indigo color batik. On brown batik, however, the marble effect was accepted.

The number of colors in batik represents how many times it was immersed in the dye bath and how many times wax had to be applied and removed. A multicolored batik represents a lot more work that a single or two-color piece. Numerous dye processes are usually reflected in the price of the cloth. Nowadays, chemical dyes have pretty much replaced traditional dyes, so colors are endless and much more liberally used.

Special Treatments to the Batik Cloth

Prada or Gold Cloth

For special occasions, batik was formerly decorated with gold lead or gold dust. This cloth is known as Prada cloth. Gold leaf was used in the Jogjakarta and Surakarta area. The Central Javanese used gold dust to decorate their Prada cloth. It was applied to the fabric using a handmade glue consisting of egg white or linseed oil and yellow earth. The gold would remain on the cloth even after it had been washed. The gold could follow the design of the cloth or could take on its own design. Older batiks could be given a new look by applying gold to them. Gold decorated cloth is still made today; however, gold paint has replaced gold dust and leaf.

Batik Designs

Although there are thousands of different batik designs, particular designs have traditionally been associated with traditional festivals and specific religious ceremonies. Previously, it was thought that certain cloth had mystical powers to ward off ill fortune, while other pieces could bring good luck.

Wedding Batik

Certain batik designs are reserved for brides and bridegrooms as well as their families. Other designs are reserved for the Sultan and his family or their attendants. A person's rank could be determined by the pattern of the batik he/she wore.

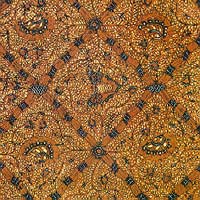
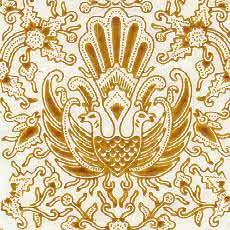
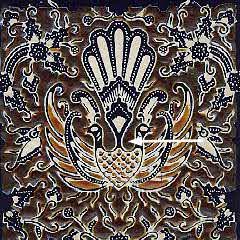
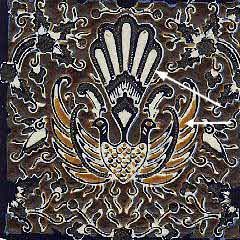
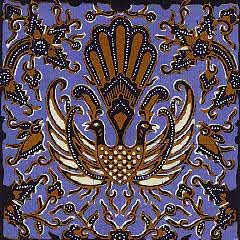
In general, there are two categories of batik design: geometric motifs (which tend to be the earlier designs) and free form designs, which are based on stylized patterns of natural forms or imitations of a woven texture. Nitik is the most famous design illustrating this effect.

Certain areas are known for a predominance of certain designs. Central Javanese designs are influenced by traditional patterns and colors. Batik from the north coast of Java, near Pekalongan and Cirebon, have been greatly influenced by Chinese culture and effect brighter colors and more intricate flower and cloud designs.

High fashion designs drawn on silk are very popular with wealthy Indonesians. These exceptionally high-quality pieces can take months to create and costs hundreds of dollars.

Kawung

Kawung Design

Kawung is another very old design consisting of intersecting circles, known in Java since at least the thirteenth century. This design has appeared carved into the walls of many temples throughout Java such as Prambanan near Jogjakarta and Kediri in East Java. For many years, this pattern was reserved for the royal court of the Sultan of Jogjakarta. The circles are sometimes embellished inside with two or more small crosses or other ornaments such as intersecting lines or dots. It has been suggested that the ovals might represent flora such as the fruit of the kapok (silk cotton) tree or the aren (sugar palm).

Ceplok

Ceplok Design

Ceplok is a general name for a whole series of geometric designs based on squares, rhombs, circles, stars, etc. Although fundamentally geometric, ceplok can also represent abstractions and stylization of flowers, buds, seeds and even animals. Variations in color intensity can create illusions of depth and the overall effect is not unlike medallion patterns seen on Turkish tribal rugs. The Indonesian population is largely Muslim, a religion that forbids the portrayal of animal and human forms in a realistic manner. To get around this prohibition, the batik worker does not attempt to express this matter in a realistic form. A single element of the form is chosen and then that element is repeated again and again in the pattern.

Parang

Parang Design

Parang was once used exclusively by the royal courts of Central Java. It has several suggested meanings such as 'rugged rock', 'knife pattern' or 'broken blade'. The Parang design consists of slanting rows of thick knife-like segments running in parallel diagonal bands. Parang usually alternated with narrower bands in a darker contrasting color. These darker bands contain another design element, a line of lozenge-shaped motifs call mlinjon. There are many variations of this basic striped pattern with its elegant sweeping lines, with over forty parang designs recorded. The most famous is the 'Parang Rusak' which in its most classical form consisting of rows of softly folded parang. This motif also appears in media other than batik, including woodcarving and as ornamentation on gamelan musical instruments.

Washing Batik

Harsh chemical detergents, dryers and drying of fabrics in the sun may fade the colors in batik. Traditionally dyed batiks should be washed in soap for sensitive fabrics, such as Woolite, Silky or Halus. Fine batik in Indonesia is washed with the lerak fruit which can be purchased at most traditional markets. A bottled version of this detergent is also available at batik stores. Be sure to line dry batik in a shady area and not in direct sunlight.

Modern Batik

Modern batik, although having strong ties to traditional batik, utilizes linear treatment of leaves, flowers and birds. These batiks tend to be more dependent on the dictates of the designer rather than the stiff guidelines that have guided traditional craftsmen. This is also apparent in the use of color that modern designers use. Artisans are no longer dependent on traditional (natural) dyes, as chemical dyes can produce any color that they wish to achieve. Modern batik still utilizes canting and cap to create intricate designs.

Modern Batik

Fashion designers such as Iwan Tirta have aggressively introduced batik into the world fashion scene. They have done much to promote the Indonesian art of batik dress, in its traditional and modern forms.

The horizon of batik is continuing to widen. While the design process has remained basically the same over the last century, the process shows great progress in recent decades. Traditionally, batik was sold in 2 1/4 meter lengths used for kain panjang or sarong in traditional dress. Now, not only is batik used as a material to clothe the human body, its uses also include furnishing fabrics, heavy canvas wall hangings, tablecloths and household accessories. Batik techniques are used by famous artists to create batik paintings which grace many homes and offices.

Modern Batik

Fine quality handmade batik is very expensive and the production of such works is very limited. However, in a world that is dominated by machines there is an increasing interest in materials that have been handmade. Batik is one of these materials.

During your stay in Indonesia, take advantage of your time here to learn more about the fascinating world of batik. Have a batik dress or men's business shirt made for you by a seamstress or tailor. Visit batik factories in Jogjakarta, Surakarta or Pekalongan to see for yourself how the intricate process is conducted or ask questions of batik artisans giving demonstrations in stores such as Sarinah or Pasaraya in Jakarta. You will come away with sense of wonder over the time, effort and patience put into the creation of each batik cloth. You too may soon grow to love the distinctive waxy smell of batik and your batik acquisitions will provide many memories of your stay in Indonesia. Your support of the batik industry will also ensure that this art form grows to even greater peaks.

Batik Home Furnishings

One of the distinct pleasures of living in (or visiting) Indonesia is the opportunity to purchase some truly magnificent home furnishings made of batik. As the fabric is truly unique to Indonesia... this is definitely the best place to purchase batik! Batik factories can product batik to your order, with custom colors and designs in large rolls, ready to use for your home decoration projects. The 100% cotton fabric is usually preshrunk in the batik dying process and other fabrics are usually available with the batik design, should your design requirements warrant. Higher end shops also have design consultants who can help you with the layout of the room you are planning to design with your batik fabric and work with you on additional furnishings (pillows, bed covers, and cushions) to complete your color scheme.


The Step by Step Process of Making Batik

Step One in the batik making process

Step 1

The first wax is applied over the penciled-in outline of the pattern. Almost always the original cloth is white or beige.

Step 2 in the batik making process

Step 2

The cloth is dyed in the first dye bath. In this case the first dyebath is indigo blue. The area of the cloth where the wax was applied in Step 1 will remain white.

Step 3 in the batik making process

Step 3

Second application of wax is applied. In this case it is a dark brown color. A poorer quality of wax is used to cover larger areas of cloth. The darker color helps to differentiate it from the first wax applied. Any parts that are covered with this wax application will remain the indigo color.

Step 4 in the batik making process

Step 4

The cloth is dyed in the second dye bath. In this case it is a navy blue. Any areas that are not covered by wax will become dark blue.

Step 5 in the batik making process

Step 5

All the wax that has been applied thus far is removed. This is done by heating the wax and scraping it off and also by applying hot water and sponging off the remaining wax.

Step 6 in the batik making process

Step 6

Wax is applied to the area of the fabric that the artist wishes to remain the indigo blue color.

Step 7 in the batik making process

Step 7

Wax is applied to the area of the fabric that the artist wishes to remain white.

Step 8 in the batik making process

Step 8

The fabric is submerged in the final dye bath. In this case it is brown. Any areas of the cloth that have not been covered with wax will become brown.

Step 9 in the batik making process

Step 9

The finished cloth after all of the wax has been removed.


http://www.expat.or.id


Papercrafts: 1st Starter

CHARIZARD


006 / CHARIZARD - Pokémon Papercraft
Name: Charizard
Type: Fire/Flying
Species: Flame Pokémon
Height: 1.7 m (5′07″)
Weight: 90.5 kg (199.5 lbs.)
Interesting Facts: Unlike its pre-evolutions, it has wings that can allow it to fly. Charizard is a very dragon-like Pokémon. Like its previous forms, it has a long tail with a fire burning at the tip. It has extremely sharp claws, a long neck, and two horns protruding from the back of its head. The front of its two wings is blue, while the back is orange like the most of its body. Although hardly visible, Charizard's iris is light blue in color. Its belly and the undersides of its feet are cream-colored.

THE PAPER MODEL
Height: 22.3 cm/ 8.8 in
Width: 27.3 cm / 10.7 in
Depth: 23.6 cm / 9.3 in
Pages: 9
Pieces: 68
Level: Medium-Hard
Designer: Brandon
Photo: Brandon
NOTES: Just follow the numbers, and it's pretty simple. Take special care with the wings and claws, they're the most difficult.

Download includes 2 versions: 1 regular version (Non Shiny) and 1 Mirrored version (Can be seen in Shiny, but is not purely shiny). Mirrored aspect not reflected in 3D representation of the pdo.

Also included is an additional texture pack including all of the varients from Brawl. (Requires PDO to use)

Download: A4 / Letter | Mirrored A4 / Mirrored Letter - Brawl Texture Pack


VENUSAUR


003 / VENUSAUR - Pokémon Papercraft
Name:
Venusaur
Type: Grass / Poison
Species: Seed Pokémon
Height: 2.0 m (6′07″)
Weight: 100.0 kg (220.5 lbs.)
Interesting Facts: Venusaur is the version mascot of both Pokémon Green Version and LeafGreen Version, appearing on the boxart of both. It evolves from Ivysaur starting at level 32. It is the final form of Bulbasaur.

THE PAPER MODEL
Height: 13.6 cm/5.4 in
Width: 17.7 cm/ 7 in
Depth: 30.6 cm/12 in
No. of Pages: 6
No. of Pieces: 52
Level: Easy
Designer: Brandon
Photo: Fezco
NOTES: Pieces are numbered, and some simple instructions are in the template. Just be sure to attach the tree trunk and leaves before closing the body, and it should be a pretty simple build.

Download: A4 / Letter

BLASTOISE


009 / BLASTOISE - Pokémon Papercraft
Name: Blastoise
Type: Water
Species: Shellfish Pokémon
Height: 1.6 m (5'03")
Weight: 85.5 kg (188.5 lbs.)
Interesting Facts: Blastoise is a large, bipedal, blue tortoise-like Pokémon with a tough brown shell and two powerful water cannons, which are like steel in appearance, that jut out of the top sides of its shell. The cannons can be withdrawn inside the shell, or rotated to point backwards; this enables Blastoise to commence jet assisted rams.

THE PAPER MODEL
Height: 15.9 cm/ 6.3 in
Width: 22.2 cm/ 8.7 in
Depth: 23.5 cm/ 9.3 in
Pages: 7
Pieces: 55
Level: Medium
Designer: Brandon
Photo: LuIS
NOTES: This one is moderately easy, just follow the numbers and included instructions.

Download: A4 / Letter

NASA 2012 Prediction

nasa solar flare 2012 magnetic field

The year 2008 earned what NASA called the Sun’s blankest year of the space age; it hasn’t been this quiet since the year of 1913. No solar flares. However, sunspot counts for 2009 have dropped even lower. “We’re experiencing a very deep solar minimum,” says solar physicist Dean Pesnell of the Goddard Space Flight Center.

NASA 2012 predictions, on the other hand, are radically effected. Solar physicist David Hathaway of the National Space Science & Technology Center (NSSTC) explains that currently the magnetic “belts” of the sun are turning very fast which means that lots of magnetic fields are being swept up, and that a future sunspot cycle is going to be intense. Solar flare and sunspot activity can be predicted even earlier, and Hathaway stated “The belt was turning fast in 1986-1996. Old magnetic fields swept up then should re-appear as big sunspots in 2010-2011.”

Like most experts in the field, Hathaway agrees that the next solar maximum should be a doozy. But he disagrees with one point — Mausumi Dikpati of the National Center for Atmospheric Research (NCAR) forecast Solar Max at 2012. Hathaway believes it will arrive sooner, in 2010 or 2011.

There was a minor solar flare in the fall of 2005 that resulted in all GPS signals on one side of the Earth being noticeably degraded and sensitive electronic equipment on land malfunctioning . When those results are scaled up to the power of the super solar flares expected on or before 2012, researchers say the world would be set back many, many years as far as technology is concerned. Earth’s atmosphere protects us and our equipment from regular solar flares, but can be easily penetrated by a more powerful one. Everything from our modern home electronics to the power grid are susceptible, even shielded military equipment.

The problem is, such intense solar activity have never been experienced in our modern, electronic age. An event like the one on September 1–2, 1859 (the largest recorded geomagnetic storm), which caused the failure of telegraph systems all over Europe and North America and created auroras visible in the Caribbean, would be utterly devastating today. The telegraph systems used then were wholly primitive compared to the microelectronics of today that are found in everything from wrist watches and home computers and space satellites.

http://www.whatwillhappenin2012now.com

Solar Storm Warning


March 10, 2006:
It's official: Solar minimum has arrived. Sunspots have all but vanished. Solar flares are nonexistent. The sun is utterly quiet.

Like the quiet before a storm.

This week researchers announced that a storm is coming--the most intense solar maximum in fifty years. The prediction comes from a team led by Mausumi Dikpati of the National Center for Atmospheric Research (NCAR). "The next sunspot cycle will be 30% to 50% stronger than the previous one," she says. If correct, the years ahead could produce a burst of solar activity second only to the historic Solar Max of 1958.

see captionThat was a solar maximum. The Space Age was just beginning: Sputnik was launched in Oct. 1957 and Explorer 1 (the first US satellite) in Jan. 1958. In 1958 you couldn't tell that a solar storm was underway by looking at the bars on your cell phone; cell phones didn't exist. Even so, people knew something big was happening when Northern Lights were sighted three times in Mexico. A similar maximum now would be noticed by its effect on cell phones, GPS, weather satellites and many other modern technologies.

Right: Intense auroras over Fairbanks, Alaska, in 1958.

Dikpati's prediction is unprecedented. In nearly-two centuries since the 11-year sunspot cycle was discovered, scientists have struggled to predict the size of future maxima—and failed. Solar maxima can be intense, as in 1958, or barely detectable, as in 1805, obeying no obvious pattern.

The key to the mystery, Dikpati realized years ago, is a conveyor belt on the sun.

We have something similar here on Earth—the Great Ocean Conveyor Belt, popularized in the sci-fi movie The Day After Tomorrow. It is a network of currents that carry water and heat from ocean to ocean--see the diagram below. In the movie, the Conveyor Belt stopped and threw the world's weather into chaos.

see caption
Above: Earth's "Great Ocean Conveyor Belt." [More]

The sun's conveyor belt is a current, not of water, but of electrically-conducting gas. It flows in a loop from the sun's equator to the poles and back again. Just as the Great Ocean Conveyor Belt controls weather on Earth, this solar conveyor belt controls weather on the sun. Specifically, it controls the sunspot cycle.

Solar physicist David Hathaway of the National Space Science & Technology Center (NSSTC) explains: "First, remember what sunspots are--tangled knots of magnetism generated by the sun's inner dynamo. A typical sunspot exists for just a few weeks. Then it decays, leaving behind a 'corpse' of weak magnetic fields."

Enter the conveyor belt.

see caption"The top of the conveyor belt skims the surface of the sun, sweeping up the magnetic fields of old, dead sunspots. The 'corpses' are dragged down at the poles to a depth of 200,000 km where the sun's magnetic dynamo can amplify them. Once the corpses (magnetic knots) are reincarnated (amplified), they become buoyant and float back to the surface." Presto—new sunspots!

Right: The sun's "great conveyor belt."

All this happens with massive slowness. "It takes about 40 years for the belt to complete one loop," says Hathaway. The speed varies "anywhere from a 50-year pace (slow) to a 30-year pace (fast)."

When the belt is turning "fast," it means that lots of magnetic fields are being swept up, and that a future sunspot cycle is going to be intense. This is a basis for forecasting: "The belt was turning fast in 1986-1996," says Hathaway. "Old magnetic fields swept up then should re-appear as big sunspots in 2010-2011."

Like most experts in the field, Hathaway has confidence in the conveyor belt model and agrees with Dikpati that the next solar maximum should be a doozy. But he disagrees with one point. Dikpati's forecast puts Solar Max at 2012. Hathaway believes it will arrive sooner, in 2010 or 2011.

"History shows that big sunspot cycles 'ramp up' faster than small ones," he says. "I expect to see the first sunspots of the next cycle appear in late 2006 or 2007—and Solar Max to be underway by 2010 or 2011."

Who's right? Time will tell. Either way, a storm is coming.

Author: Dr. Tony Phillips | Production Editor: Dr. Tony Phillips | Credit: Science@NASA

http://science.nasa.gov


2012: Beginning of the End or Why the World Won't End?

Scenes from the upcoming film 2012. Courtesy Columbia Pictures.
Scenes from the motion picture "2012." Courtesy Columbia Pictures. Remember the Y2K scare? It came and went without much of a whimper because of adequate planning and analysis of the situation. Impressive movie special effects aside, Dec. 21, 2012, won't be the end of the world as we know. It will, however, be another winter solstice.

Much like Y2K, 2012 has been analyzed and the science of the end of the Earth thoroughly studied. Contrary to some of the common beliefs out there, the science behind the end of the world quickly unravels when pinned down to the 2012 timeline. Below, NASA Scientists answer several questions that we're frequently asked regarding 2012.

Question (Q): Are there any threats to the Earth in 2012? Many Internet websites say the world will end in December 2012.
Answer (A): Nothing bad will happen to the Earth in 2012. Our planet has been getting along just fine for more than 4 billion years, and credible scientists worldwide know of no threat associated with 2012.

Q: What is the origin of the prediction that the world will end in 2012?
A: The story started with claims that Nibiru, a supposed planet discovered by the Sumerians, is headed toward Earth. This catastrophe was initially predicted for May 2003, but when nothing happened the doomsday date was moved forward to December 2012. Then these two fables were linked to the end of one of the cycles in the ancient Mayan calendar at the winter solstice in 2012 -- hence the predicted doomsday date of December 21, 2012.

Q: Does the Mayan calendar end in December 2012?
A: Just as the calendar you have on your kitchen wall does not cease to exist after December 31, the Mayan calendar does not cease to exist on December 21, 2012. This date is the end of the Mayan long-count period but then -- just as your calendar begins again on January 1 -- another long-count period begins for the Mayan calendar.

Q: Could phenomena occur where planets align in a way that impacts Earth?
A: There are no planetary alignments in the next few decades, Earth will not cross the galactic plane in 2012, and even if these alignments were to occur, their effects on the Earth would be negligible. Each December the Earth and sun align with the approximate center of the Milky Way Galaxy but that is an annual event of no consequence.

"There apparently is a great deal of interest in celestial bodies, and their locations and trajectories at the end of the calendar year 2012. Now, I for one love a good book or movie as much as the next guy. But the stuff flying around through cyberspace, TV and the movies is not based on science. There is even a fake NASA news release out there..."
- Don Yeomans, NASA senior research scientist
Q: Is there a planet or brown dwarf called Nibiru or Planet X or Eris that is approaching the Earth and threatening our planet with widespread destruction?
A: Nibiru and other stories about wayward planets are an Internet hoax. There is no factual basis for these claims. If Nibiru or Planet X were real and headed for an encounter with the Earth in 2012, astronomers would have been tracking it for at least the past decade, and it would be visible by now to the naked eye. Obviously, it does not exist. Eris is real, but it is a dwarf planet similar to Pluto that will remain in the outer solar system; the closest it can come to Earth is about 4 billion miles.

Q: What is the polar shift theory? Is it true that the earth’s crust does a 180-degree rotation around the core in a matter of days if not hours?
A: A reversal in the rotation of Earth is impossible. There are slow movements of the continents (for example Antarctica was near the equator hundreds of millions of years ago), but that is irrelevant to claims of reversal of the rotational poles. However, many of the disaster websites pull a bait-and-shift to fool people. They claim a relationship between the rotation and the magnetic polarity of Earth, which does change irregularly, with a magnetic reversal taking place every 400,000 years on average. As far as we know, such a magnetic reversal doesn’t cause any harm to life on Earth. A magnetic reversal is very unlikely to happen in the next few millennia, anyway.

The Blue Marble: Next GenerationEarth, as seen in the Blue Marble: Next Generation collection of images, showing the color of the planet's surface in high resolution. This image shows South America from September 2004. Q: Is the Earth in danger of being hit by a meteor in 2012?
A: The Earth has always been subject to impacts by comets and asteroids, although big hits are very rare. The last big impact was 65 million years ago, and that led to the extinction of the dinosaurs. Today NASA astronomers are carrying out a survey called the Spaceguard Survey to find any large near-Earth asteroids long before they hit. We have already determined that there are no threatening asteroids as large as the one that killed the dinosaurs. All this work is done openly with the discoveries posted every day on the NASA NEO Program Office website, so you can see for yourself that nothing is predicted to hit in 2012.

Q: How do NASA scientists feel about claims of pending doomsday?
A: For any claims of disaster or dramatic changes in 2012, where is the science? Where is the evidence? There is none, and for all the fictional assertions, whether they are made in books, movies, documentaries or over the Internet, we cannot change that simple fact. There is no credible evidence for any of the assertions made in support of unusual events taking place in December 2012.

Q: Is there a danger from giant solar storms predicted for 2012?
A: Solar activity has a regular cycle, with peaks approximately every 11 years. Near these activity peaks, solar flares can cause some interruption of satellite communications, although engineers are learning how to build electronics that are protected against most solar storms. But there is no special risk associated with 2012. The next solar maximum will occur in the 2012-2014 time frame and is predicted to be an average solar cycle, no different than previous cycles throughout history.

http://www.nasa.gov


Rabu, 21 September 2011

KISAH TELOR DAN EMPING GOSONG

Dua puluh tahun telah berlalu, namun masih terbayang jelas kenangan indah itu:
Suatu malam, ibu yg bangun sejak pagi, bekerja keras sepanjang hari, membereskan rumah tanpa pembantu, jam tujuh malam ibu selesai menghidangkan makan malam untuk ayah yang sangat sederhana berupa telur mata sapi, kerupuk emping, sambal teri dan nasi. Sayangnya karena mengurusi adik yg merengek, emping dan telor gorengnya sedikit gosong!
Saya melihat ibu sedikit panik, tapi tidak bisa berbuat banyak, minyak gorengnya sudah habis. Kami menunggu dengan tegang apa reaksi ayah yang pulang kerja, pasti sudah capek melihat makan malamnya hanya emping dan telur gosong. Luar biasa ! Ayah dengan tenang menikmati dan memakan
semua yang disiapkan ibu dengan tersenyum, dan bahkan berkata, "Bu terima kasih ya!"
Lalu ayah terus menanyakan kegiatan saya & adik di sekolah. Selesai makan, masih di meja makan, saya mendengar mama meminta maaf krn telor & emping yang gosong itu & satu hal yg tidak pernah saya lupakan adalah apa yang ayah katakan: "Sayang, aku suka telor & emping yg gosong."
Sebelum tidur, saya pergi untuk memberikan ciuman selamat tidur kepada ayah, saya bertanya "apakah ayah benar-benar menyukai telur & emping gosong?" Ayah memeluk saya erat dengan kedua lengannya yg kekar & berkata, "Anakku, ibu sudah bekerja keras sepanjang hari & dia benar-benar sudah capek,
Jadi sepotong telor & emping yg gosong tdk akan menyakiti siapa pun kok!"

Ini pelajaran yang saya
praktekkan di tahun-tahun
berikutnya;
"Belajar menerima kesalahan orang lain, adalah satu kunci yang
sangat penting untuk menciptakan sebuah hubungan yang sehat, bertumbuh & abadi. Ingatlah emosi tidak akan pernah menyelesaikan masalah yang ada & selalulah berpikir dewasa mengapa sesuatu hal itu bisa terjadi pasti punya alasannya sendri... Janganlah kita menjadi orang yg egois hanya mau dimengerti, tapi tidak mau mengerti :)

Tua itu pasti, tapi Dewasa itu
PILIHAN, & Manusia yg
dewasa adalah manusia
PILIHAN.

nikiDUA®

ENJOY YG MENJATUHKAN

Seekor monyet sedang
nangkring di pucuk pohon
kelapa. Dia nggak sadar sedang diintip oleh tiga angin gede.. Angin Topan, Tornado n Bahorok. Tiga angin itu rupanya pada ngomongin, siapa yang bisa paling cepet jatuhin si monyet dari pohon kelapa.
Angin Topan bilang, dia cuma perlu waktu 45 detik. Angin Tornado nggak mau kalah, 30 detik, katanya. Angin Bahorok senyum
ngeledek dan bilang, 15 detik juga jatuh tuh monyet.
Akhirnya satu persatu ketiga angin itu maju. Angin TOPAN duluan, dia tiup sekenceng-kencengnya, Wuuusss… Merasa ada angin gede datang, si monyet langsung megang batang pohon kelapa. Dia pegang sekuat-kuatnya.
Beberapa menit lewat, nggak jatuh-jatuh tuh monyet. Angin Topan pun nyerah. Giliran Angin TORNADO. Wuuusss… Wuuusss… Dia tiup sekenceng-kencengnya. Nggak jatuh juga tuh monyet. Angin Tornado jg nyerah. Terakhir, Angin BAHOROK. Lebih kenceng lagi dia tiup. Wuuuss… Wuuuss… Wuuuss…
Si monyet malah makin kenceng pegangannya. Nggak jatuh juga. Ketiga angin gede itu akhirnya ngakuin, si monyet memang jagoan.
Tangguh. Daya tahannya luar biasa.
Ngga lama, datang angin Enjoy-Enjoy.
Dia bilang mau ikutan jatuhin si monyet. Keinginan îτϋ diketawain oleh tiga angin lainnya. Yang gede aja nggak bisa, apalagi yang kecil. Nggak banyak omong, angin Enjoy-Enjoy langsung niup ubun-ubun si monyet. Psssss… Enak banget. Adem… Seger… Riyep-riyep matanya si monyet. Nggak lama ketiduran dia trus lepaslah pegangannya. Alhasil, jatuh deh tuh si monyet.
Guys, boleh jadi ketika kita Diuji dengan KESUSAHAN… Dicoba dengan Penderitaan…
Didera Malapetaka...
Kita kuat bahkan lebih kuat dari sebelumnya...
Tapi jika kita diuji dengan KENIKMATAN...
KESENANGAN...
KELIMPAHAN...
Di sinilah kejatuhan îτϋ terjadi..
So, Jangan sampai kita terlena...
Tetap rendah hati dan mawas diri, ingat semua itu hanya titipan dari Tuhan selama kita di dunia..
Karena Kita Bukan Monyet !!

nikiDUA®

Sabtu, 03 September 2011

How To Draw Trees

How To Draw Trees


Learning how to draw trees is a lot easier than you may think...

Many budding artists of all ages are put off because they've only previously managed a 'lollipop' that they remember producing when they were at school.

And yet, a lollipop isn't a million miles away from many real trees in full summer foliage.

You just need to know where to 'tweak' your sketch to make your lollipop look the part. So if you think you couldn't draw the tree below - or even better? Well read on ...

Drawing Trees

The good thing about learning how to draw trees is that unlike a portrait, where the features have to be in the right place for the face to look right, if you put a branch in the wrong place on a tree, it still looks like a tree.

This tutorial gets you started using basic, familiar shapes you've seen a hundred times.

But until now, I bet you never thought it would teach you how to draw trees !

Add a couple of simple techniques that I promise anyone can manage, and you'll be drawing believable, realistic trees with confidence in no time.

All you will need to start with is a pencil, an eraser and a few pieces of scrap paper or a pad.

However, before we actually put pencil to paper, let's have a closer look at the photo below...

Get a Good Long Point on Your Pencil ...

Notice first that the top (black) pencil has a long point on it.

I've achieved this with a craft knife. Pencil sharpeners are OK but you can't get the tip of the pencil like this with them.

The tip of the yellow pencil has been done with a pencil sharpener. This will soon wear down as you sketch and you'll be constantly stopping to re-sharpen it.

The long point on the black pencil means that I can make a broader, more confident line, achieving the full thickness of many of the lower branches, in one go.

Also, when I come to shade in larger areas, I can do this much more quickly and effectively holding the pencil this way.

Look at the three marks I've made - all with this same point. The widest one is achieved just by holding the pencil with the

point flat to the paper, like a pastel stick. This is perfect for sweeping in the thicker, lower branches in one go.

As I reach the uppermost twigs, I can start to use more of the point to get the finer lines needed here.

Incidentally, the photo also shows a putty eraser. These can be pulled and stretched to a fine point or edge to take out just a small area of pencil if you want - ideal for lifting out highlights!

They're also less likely to damage the surface of your paper than a cheaper general purpose eraser.


How To Draw Trees - Step 1

Start with the Ace of Clubs!

Right, Let's get going...! Look at Sketch 1 on the right.

Ever played cards? Almost certainly. Look at this sketch of the Ace of Clubs.

What do you see - a perfect starting point for learning how to draw trees!

As you become more experienced, you'll see all sorts of shapes that you will realise can simplify or inspire you to draw and paint all sorts of things.

Learning how to draw trees is no different.

In this case the Ace of Clubs represents a rounded, deciduous tree, but what could be simpler than a long, thin triangle or upturned popcorn cone to give you the basis of a fir tree?

The Ace of Clubs is quite simply three circles and a triangle for the base.


How to Draw Trees - Step 2

In sketch 2, I've stretched this out so the circles are all different sizes and the base is a bit more elongated.

Playing around with the Ace of Clubs

The circles don't even have to be perfectly round - in fact it's better if they're not.

See them as a simple framework as a simple way to get you started sketching trees.

Already a believable tree is starting to take shape.

I've drawn these lines a bit heavier than you should, so they show up on the web page.

You should draw them in a bit lighter than this and gradually get heavier as the final tree shape develops.

Don't worry if your guidelines aren't perfect - remember, they are just that - a guide - and some of them will be rubbed out shortly anyway.

Also, don't concern yourself about producing specific species of tree just yet - we can look at that when you've built up your confidence with this one...


How to Draw Trees - Step 3

A winter tree emerges...

Now look at Sketch 3. I've started to draw branches from the main trunk. They're quite thick at first but gradually taper as they reach the edges of the tree.

Notice how I've kept these lines quite raggedy to represent the random way trees grow.

One thing I don't want to do is make them appear too even. That wouldn't be how nature intended!

When you're first learning how to draw trees a useful tip is to ensure that as one branch diverges from the trunk, the next usually diverges a bit further up.

It's very rare that two branches split exactly opposite each other from the main branch.

If you just want learn how to draw trees in winter, then you can start shading in the branches at this point. Remember to pick the direction the sun is coming from and stick to it!


How to Draw Trees - Step 4

A frequent problem when students are sketching trees is that they have the light coming from different directions...

They put shadows on opposite sides of branches at different points and it looks all wrong.

The sunny side will be the lightest - in this case the left hand side. The opposite side of the branches and trunk will be in shadow ...

A Summer Tree Appears

However, a summer tree covered in leaves needs a little more work. As in Sketch 4, I've lightly scribbled an outline round the edge of the tree.

I've also rubbed out some, but not all, of the branches. The ones left are those you can see through the leaves. When I teach students how to draw trees I always emphasise how important it is to create a three-dimensional effect and also show the 'openness' of the tree.

Putting in some branches here and there gives the impression of them twisting in and out of view as they spread to the outer edges of the tree.

Remember, a tree is not a flat object...

It has branches coming towards and going away from you as well as the ones you see either side and in the centre as well.

I've drawn some light outlines around these remaining branches just to remind you that these are your 'sky holes'.

Once you've a little more experience you won't need to bother with this.


How to Draw Trees - Step 5

Sketch 5 is where the real fun starts in learning how to draw trees.

You're now about to switch on the sunlight by adding shadows and putting back in some highlights.

Remember, even more than with the winter tree, to decide which direction your sunlight is coming from.

As well as the main shadows being on the opposite side of the tree, it will be dark around the sky holes where you can see branches.

These visible branches will almost always be in silhouette and quite dark, as will the shadow on the ground.

The finished tree ...

There are many ways you can draw leaves. However, for a tree this size, the one thing you don't want is to draw each individual leaf!

Apart from driving you slowly mad, it would look very forced and unreal. Instead, you're aiming for an impression of leaves and the lights and darks in the tree.

Try letting your pencil dance over the tree in a demented scribble.

This, with a little practice, can create an excellent representation of leaves. Dark areas can be filled in to create lights and darks next to each other.

Or you could shade in most areas as with the Ace of Clubs in sketch 1, then lift out highlights with an eraser. The sketches below show these ideas in more detail.


How to draw trees - detail 1How to draw trees - detail 2


How to draw tree - branch detail 2 How to draw trees - branch detail 1


How to draw trees -trunk detail

When you add your shadow on the ground on the opposite side from the sunlight, put a smaller area of shadow on the ground on the sunlit side as these branches would still cast some shadows.

Notice that I've also taken out the bottom line where the trunk meets the ground...

Look at the examples in the sketch of the trunks (above) for comparison and see how the right hand drawing makes the trunk 'grow' right out of the ground and not sit on top of it.


Remember also when you learn how to draw trees, to draw your boughs and branches from the base upwards i.e. as the tree would 'grow'.

Make sure each branch in your sky holes appears to come from a logical point on the trunk below. The eye will then happily 'fill in' the branch's position behind the leaf clusters even though you haven't actually drawn it.

Now have a look out of your window or find a photo of a real tree and try copying it.

Simplification is the key! You're looking for a basic outline to begin with and you don't want to copy every leaf - just the main leaf clusters. These tend to be either rounded balls or flat, as in the case of evergreens.

The bottom half of the visible part of the trunk should be lit up with sunlight on one side, with the other side in increasing shadow. Look at Sketch 5.

The trunk area immediately below the bottom leaf clusters will usually all be in shadow as very little light will be able to reach, whatever the position of the sun.


To Sum Up...

Finally, as with many art techniques, learning how to draw trees is often easier to do than to describe...

Hopefully, this tutorial has given you a few pointers to give you the confidence to get going.

Remember, if you can draw the Ace of Clubs playing Poker, you can just as easily draw it with a pencil as well ...!